Extending Van Gogh’s Starry Night with Inpainting
Can computers learn to paint like Van Gogh? To some extent—definitely yes! For that, akin to human imitation artists, an algorithm should first be fed the original artists’ creations, and then it will be able to generate a machine take on them. How well? Please judge for yourself.

Second prize in the ZEISS photography competition
Recently the Department of Engineering at the University of Cambridge announced the winners of the annual photography competition, “The Art of Engineering: Images from the Frontiers of Technology.” The second prize went to Yarin Gal, a PhD student in the Machine Learning group, for his extrapolation of Van Gogh’s painting Starry Night, shown above. Readers can view this and similar computer-extended images at Gal’s website Extrapolated Art. An inpainting algorithm called PatchMatch was used to create the machine art, and in this post I will show how one can obtain similar effects using the Wolfram Language.
The term “digital inpainting” was first introduced in the “Image Inpainting” article at the SIGGRAPH 2000 conference. The main goal of inpainting is to restore damaged parts in an image. However, it is also widely used to remove or replace selected objects.
In the Wolfram Language, Inpaint is a built-in function. The region to be inpainted (or retouched) can be given as an image, a graphics object, or a matrix.

There are five different algorithms available in Inpaint that one can select using the Method option: “Diffusion,” “TotalVariation,” “FastMarching,” “NavierStokes,” and “TextureSynthesis” (default setting). “TextureSynthesis,” in contrast to other algorithms, does not operate separately on each color channel and it does not introduce any new pixel values. In other words, each inpainted pixel value is taken from the parts of the input image that correspond to zero elements in the region argument. In the example below, it is clearly visible that these properties of the “TextureSynthesis” algorithm make it the method of choice for removing large objects from an image.

The “TextureSynthesis” method is based on the algorithm described in “Image Texture Tools,” a PhD thesis by P. Harrison. This algorithm is an enhanced best-fit approach introduced in 1981 by D. Garber in “Computational Models for Texture Analysis and Texture Synthesis.” Parameters for the “TextureSynthesis” algorithm can be specified via two suboptions: “NeighborCount” (default: 30) and “MaxSamples” (default: 300). The first parameter defines the number of nearby pixels used for texture comparison, and the second parameter specifies the maximum number of samples used to find the best-fit texture.
Let’s go back to the extrapolation of Van Gogh’s painting. First, I import the painting and remove the border.

Next, I need to extend the image by padding it with white pixels to generate the inpainting region.

Now I can extrapolate the painting using the “TextureSynthesis” method.

Not too bad. Different effects can be obtained by changing the values of the “NeighborCount” and “MaxSamples” suboptions.

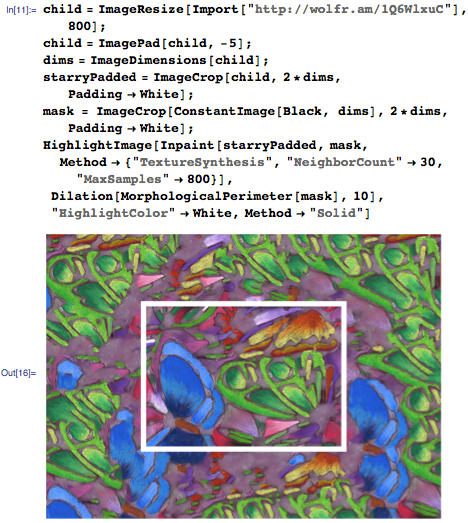
Our readers should experiment with other parameter values and artworks.*

This, perhaps, would make an original gift for the upcoming holidays. A personal artwork or a photo would make a great project. Or just imagine surprising your child by showing him an improvisation of his own drawing, like the one above of a craft by a fourteen-year-old girl. It’s up to your imagination. Feel free to post your experiments on Wolfram Community!
Download this post as a Computable Document Format (CDF) file.
*If you don’t already have Wolfram Language software, you can try it for free via Wolfram Programming Cloud or a trial of Mathematica.


I made some tests with Inpaint
http://imgur.com/a/BfcK4
Thank you for the great examples!
I played :) Maybe obvious, but I found I could (STEP 1)
crudely paint the original inpaint areas myself to provide a little art composition direction
and then (STEP 2) add noise to the mask with mask=ImageSubtract[mask, Binarize[RandomImage[1, 2*dims], .998]]]. (STEP 3) Run mostly your code and see (STEP 4) a bigger Starry Night with edge art direction by me.
Good info. Lucky me I discovered your website by chance (stumbleupon).
I have book marked it for later!