Industrial Pumpkin Carving with Mathematica
The art of pumpkin carving is hard to master, yet once a year parents in many countries are asked to perform this traditional and messy form of art.
It’s time for a change in this old tradition. In fact, our colleague Jon McLoone already made a significant advance in pumpkin carving, mainly using implicit functions and RegionPlot3D.
This year, I decided to make a contribution of my own that is more interactive and easier to use, with Mathematica or Mathematica Home Edition, of course.
Let’s start with a list. These are the things you need for traditional pumpkin carving.
- A nice looking pumpkin
- Carving tools of your choice: from a spoon and knife (if you are a true
professional) to an industrial 36,000 rpm power rotary tool (seriously, I know someone who uses one) - A bunch of candles to be placed inside the pumpkin
- A pattern for the carving on paper
For industrial Mathematica pumpkin carving, you need these tools.
- B-spline curve, surface, and function
- Color processing functions
- Morphological image processing functions
- ParametricPlot3D with Texture
- A pattern for the carving as a bitmap
Intrigued? Let us begin.
First of all, we need to design the pumpkin itself. How about an industrial approach? In many manufacturing industries, B-spline or NURBS surfaces are the de facto standard for shape design.
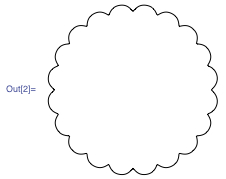
This is a profile curve of a horizontal cross section of a pumpkin.

![]()

By controlling n and d, you can manipulate the number of ribs and the depth of the grooves on the pumpkin’s surface.
Here is a portion of the curve magnified to show you how the control points are configured. Note that control points at the grooves are duplicated to create sharp creases.
![]()

To generate a surface, we need a vertical profile, too. A simple Manipulate gives you an easy way to create one.


To create a surface from the horizontal cross section curve and the vertical B-spline curve, we simulate a surface of revolution by inserting cross section control points perpendicular to the rotational axis—in this case, the z axis.

This is the resulting surface.


With this interface, you can create pumpkin surfaces dynamically.

If you download the CDF at the bottom of the post and open it in Mathematica, you can use your own pumpkin shape for the rest of this post. By clicking the Set the values button, the values of the variables pumpkinProfile and pumpkinPoints will be set to the profile curve control points and the current configuration of surface control points, respectively. (This will not work in your browser; you must download the CDF at the end of this post to try it out.)
Now it is time for the carving pattern. We will start with any grayscale bitmap image with square dimensions. Black pixels will represent carved areas, whereas white will be background. You can find many patterns on the web. You may need to use ColorNegate to invert the colors. I found this one.

A pattern is valid only if the background has no disconnected components. Otherwise your carved area will have dangling pieces. You can test a pattern by applying MorphologicalComponents and checking whether there is only one component.

![]()
We’ll texture-map the carving image onto the pumpkin surface, but first we have to adjust the image somewhat so that it is suitable for use as a texture. First, we resize it and pad it so that it becomes a 200 x 200 bitmap image. Then the image needs to be padded so that the texture will cover the whole pumpkin surface.

Now we need to turn the pattern into a texture map. To make the carving realistic, we will use a texture map with an alpha channel. Where the alpha channel value is 0, the corresponding pixel will be completely transparent, thus creating the effect of a carved pixel. The rest of the area will be colored orange using some color channel arithmetic.

Here is the result with our input.
![]()

Now it’s carving time! Currently, BSplineSurface does not support textures directly. So we rely instead on BSplineFunction and ParametricPlot3D. The good news is that the arguments and options of BSplineFunction are fully compatible with those of BSplineSurface, so the switch requires no extra editing work.

The texture is applied only to the outer shell of the pumpkin using FaceForm. “RenderingOptions” is used to avoid possible erroneous rendering of textures with alpha channels on some kinds of hardware. Now this is how our carved pumpkin looks.
![]()

Let’s make it a bit spookier—by implementing flickering candles and a darker environment.

I asked talented Wolfram colleagues to help me with some good carving patterns. Here are examples from Tim Shedelbower, Jennifer Peterson, and Vitaliy Kaurov. Thank you, everyone!

Download this post as a Computable Document Format (CDF) file.


mind blowing commands
How about rotating the pumpkin in 3-D and building an mpeg file to watch it rotating? Happy HalloweenYu-Sung!
Fantastic, quite a surprising application of the tech.
Amazing!!
Fantastic post! You are expert at coding! Great!