Doing Spy Stuff with Mathematica
I was reading about the IT problems of the recently arrested, alleged Russian spies, and I wondered if they could have managed secret communications better with Mathematica.
One of the claims was that they were using digital steganography tools that kept crashing. I wanted to see how quickly I could implement digital image steganography in Mathematica using a method known as “least significant bit insertion”.
The idea of steganography is to hide messages within other information so that no one notices your communications. The word itself comes from a Latin-Greek combination meaning “covered writing”, from earlier physical methods that apparently included tattooing a message on a messenger’s head before letting him grow his hair back to hide it. In the case of digital steganography, it is all done in the math.
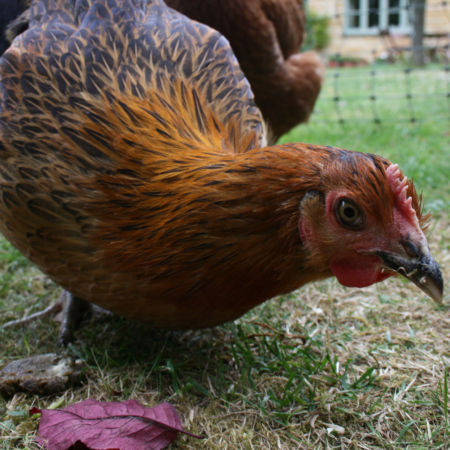
The first thing that we have to do is to pick an innocent-looking image to transmit to our spy masters, perhaps via some public online forum. This picture wouldn’t look suspicious if posted on a poultry-rearing discussion site…


Amazingly, it is possible to hide another, larger, full-color picture within this image and get it back again with about a dozen lines of Mathematica code.
The key to the whole process is to use the least significant bit in each color channel of each pixel as a place to hide information. We start by clearing that bit to zero regardless of its current value by ANDing each byte with the binary word 11111110.
We have to force Mathematica to use a strictly 8-bits-per-channel integer representation, as it will naturally work in a much more accurate color space—hence the use of “Byte” in various places in our code.
![]()
In a sufficiently complex image, the human eye doesn’t see the loss of information. The fact that one color channel on a particular pixel might or might not be darker by 1/256 than before cannot be noticed…
![]()

Even if we subtract the truncated version from the original to show only the values of the differences, you still don’t see anything unless you have very good eyes and a very good monitor.
![]()

Only by exaggerating these differences to the maximum possible contrast do we see that the differences are not zero.
![]()

Next we must convert our secret content into a sequence of bits and insert each of them into these now-empty bits in the carrier. We can put one in each pixel channel; that’s three per pixel in an RGB image.
To start the encoding we use ToCharacterCode to convert the characters into ASCII numbers…
![]()
![]()
Then we convert those to binary, padding them to a fixed number of bits even if the leading values are zero (or we won’t know where one byte begins and the next ends).
![]()

We then flatten that list and pad it with zeros to equal the total number of pixel channel values in which we are able to hide information (image width * height * 3 for RGB images). Now that we have the right number of bits, we reshape the data into the dimensions of the image and add it on to the carrier image with the cleared bits.
Here is all of that put together…

To reverse the process, we will have to pull the least significant bit from every pixel channel, group them into words of 8 bits, and convert back to text.

Let’s test it…
![]()

Now reverse the process…
![]()
![]()
You must export the image in lossless format like PNG, in the original image size. Any conversion to a lossy format, like JPG, or rescaling will destroy information in the low-value bits where we are storing our secret message.
Matilda the chicken is 450*450 pixels and has three color channels. That means that we can store 450*450*3/8 characters. Over 75,000. More than enough to hide the whole of Alice’s Adventures in Wonderland.
The added information is no greater than the information that we removed. The file will still be about the same size and still look the same to the human eye.
In fact, on average, half the pixel channels are the same as the original image, around 1/4 of the pixel channels are one bit lower than the original, and 1/4 are one bit higher, so it is closer to the original than the truncated version.
![]()

![]()

This gives us a solution to transmitting any information, as long as we can convert it to 8-bit ASCII first. Mathematica provides a set of tools for this, so for extended-character-set transmission we can use this:

![]()
![]()
We can use conversion to ASCII to insert files or data in special formats. For example, we can insert a picture. Here we import a PNG file and then re-encode it as a string of ASCII in a JPG format.

This string is only around 32,000 characters, thanks to JPG compression, somewhat smaller than the Alice text, and so, amazingly, it is easy to hide in the carrier image. We can export the image to any lossless format; the JPG encoding of the secret part is only important when we come to interpret the decoded string.
![]()

Again the carrier image looks the same to us, yet hidden inside is a secret image of “Agent H” and “Agent B”…
![]()

None of this is cryptographically secure; it is all about not being noticed transmitting information. Cryptography should be applied to the secret message before inserting it into the carrier image. And of course none of this will help at all if you can’t trust the recipient, are already under surveillance, or are silly enough to ask an undercover FBI agent to fix your laptop!


Great post, Jon!
You could still make it secure by including in one picture an encrypted message, and in another picture, to be distributed separately, the RSA key needed to unlock the message in the first picture. And part of the decoded message could be a URL of where to find the third picture (=message), etc. You could “chain” them, where every picture contains the encrypted URL, and every picture needs its own private RSA key … and M could automate all that chaining (encrypting and decrypting) with html Import of URLs … thus, you’d need ALL private keys (and M :)) to get to the final message.
Very cool article. I never knew how the color channel stuff worked. Thanks!
How quickly can you implement Westfeld and Pfitzmann’s Χ² attack on LSB-embedding?
I enjoyed this post, and Matilda looks like a friendly and beloved pet chicken, even when her image has gone through the looking glass. We run a website that features a new pet photo and story every day. If Matilda is your pet, you should nominate her for Pet of the Day! After all, she has helped you by modeling for this blog post …
awesome didn’t realise mathematica was so flexible
Haha, very funny. FBI agents have to be careful, too.
What a great post! This is great for kids learning technology.
Being a blogger is like being in charge of your own personal insane asylum.
Sent via Blackberry
I only can say the fantasy-less “fantastic”. Great post Jon!
I will listen to “Waltzing Matilda”, Tom Waits, this evening.
(something hidden in its envelope curve signal?)
Great post. I appreciate the teaching side of your post. It is showing how Mathematica can do sophisticated things easily.
Very interesting. Your code to extract the message can be made simpler and faster by taking advantage of SparseArray. For example:
ExtractMessage[img_Image] :=
Block[{msgBits, bitLength},
msgBits = SparseArray@Flatten@BitAnd[ImageData[img, “Byte”], 1];
bitLength =
msgBits /. SparseArray[_, _, _, {_, {_, {___, {a_}}}, _}] -> a;
FromCharacterCode[
FromDigits[#, 2] & /@
Partition[Normal@msgBits[[;; 8 Ceiling[bitLength/8]]], 8]]]
This is much cleaner with a SparseArray implementation. Also, it works. For some reason the code as supplied by the original article crashes my kernel (another user reported the same problem). Not sure why. Still debugging.
You may participate in the decoding contest here:
http://motls.blogspot.com/2010/07/secret-images-contest.html
Great post. I am going to try this, and hide messages on all my pictures.
Very nice. I was reading about steganography on wikipedia some time ago but I didn’t realise it could easily be done in mathematica.
I am a spy for the poultry industry. We have been working on turning chickens into little girls in sun glasses. Thank you for the information.
Looks very interesting, but the ExtractSecretMessage command keeps giving me a beep and automatically quitting my kernel without a message. Wish I could get it to go.
Dear Prof.
I come from China, my major is theory physics, so the Mathematica is very useful.
Recently, i meet a small question. All the captions (including the axis labels) for 3D figs in Mathematica are horizontal. How to change captions to be parallel to the axis?
Very nice article!!
Unfortunately proposed ExtractSecretMessage crashes MathKernel on my Mac :( However Bill Rowe’s function works!
Wow it is very very nice and interesting,
Just seen this post – marvellous fun, many thanks. I trust the chicken was unharmed during encoding.
What an eye opener!
Love the article,
Keep it up.
Also they know we’ve been to this page… they already know…
This work is pretty similar to some of the stuff I did for my masters thesis:
http://craigmil.es/docs/Thesis.pdf
This could be made better by employing a random walk, that is, the location of LSBs used to encode the message should be distributed pseudo-randomly throughout the image. This is usually accomplished by using a seeded PRNG to generate an ordered list of pixel locations. The seed then becomes a shared key that can letter be used, in conjunction with the cover-object, to retrieve the encoded message.
Also, it is not ideal to set all of the LSB’s to 0 throughout the image as it dramatically changes the numerical distribution of those LSB’s. The odds that a digital camera would encode an image with nearly all LSB’s set to 0 is just about 0. Steganography is more about hiding the existence of a message than the message itself. Such a heavily modified image would easily be detected by even the most rudimentary of steganographic detection tools.
All the same, stego is really fun stuff, so keep up the good work :)
It wouldn’t be perfect, but one way to help secure data a bit more would be to put your data into a randomly generated static image within the carrier image. Having data nested like that would require you to do the extraction function multiple times, which some people simply might not think of doing.
at First grate Post .
Could this Methode also be used For Audio?
ie. you could change the lsb of every sample in the Audiofile
and I have a question I is there a way to import the sample code to mathematica without typing it by hand ?
This method can be used to transport ANY information as long as it is able to fit in the space (about the picture – x*y*color_depth); it can be used in any non LOOSY compressed file – raw avi, wave, bitmap, png format etc.; also the used bits could be expanded (e.g. the two least signifficant bits or even three?), as long as you exploit the imperfection of nature (the eyes, the ears (in case of sound carrying format; etc…) aand last but not least as @Mooniac said, you could use it in combination with other trix and then for the hacker trying to break your code will be some veery hard time spent ;p
GOSH! With trillions of images circulating on the web… one must get paranoid!!! O_o
my first steps with image handeling in Mathematica
therefore I misd’ a simple command that is necesary to make the trick :)
Export[“inocentlookingpicture.png”, transmitImage]
whoa! this is awesome,now I will communicate with my coworkers using mathematuca :D
Great, now i am testing by mathematica.
If you can put an image in there, why not put an image in an image in an image in an image… ad infinitum (nearly)?
@Sam
The hidden data can only be 1/8 the size of the carrier data. The only way that I managed to fit an image of the same size was by benefiting from the compression provided by JPEG. Since the method described above does not survive compression, you would need to hide an uncompressed image containing an image, and so that image would be about 1/8 of the sizeof the carrier (about 1/(2Sqrt[2]) of the length).
So with a 1024 square image, you would be able to hide an image inside an image to a depth of about 6, though the deepest image would only be 2 pixels across.
I’ve seen a picture a long time ago which changed (or text appeared, not sure anymore) when you selected it (CTRL+A), can someone tell me how this method is called or how this was done?
@Jon After running the code I am running into issues while trying to extract the message. It appears that null characters are still appended to the extracted message.
Is there anyway to remove these null characters? I appears the following code in your example attempted to remove the null characters, but doesn’t work. I don’t really understand why.
StringTrim[secretData, FromCharacterCode[{0, 0, 0, 0, 0, 0, 0, 0}] ..]
Thanks,
Liam
StringTrim[secretData, FromCharacterCode[0] ..]
Should be better.
@Jon Is this an acceptable solution?
StringReplace[
ExtractSecretMessage[
InsertSecretMessage[
Import[“https://blog.wolfram.com/wp-content/uploads/2010/07/matilda.\
png”], “testing”]], “00” -> “”]
It certainly removes the null characters in this example, but I still don’t understand why your Trim doesn’t work correctly.
Thanks I really enjoyed the article. :)
The original code would trim repeated blocks of 8 null characters which would mean that up to seven would be left behind. I forget why I did it like that – perhaps there was no good reason!
Your solution will work fine as long as your hidden message is not expected to contain important null characters inside it. I don’t know whether the ExportString[…”JPG”] will generate such characters.
If you wanted to do this for real, you would be better to encode the hidden message length in the first few bits and then only read the message bits. This would have the added advantage of not filling unused bits in the carrier image with zero’s in the least significant bit- a suspicous marker for anyone looking for steganography.