Using the Wolfram Language in the Classroom: Math
This post is now available for download as a CDF file in the following languages: Chinese, German, Japanese, and Spanish. Download the Wolfram CDF Player for free here.
Welcome to the first in a series of posts on using the Wolfram Language in the classroom! Each day this week my colleagues and I will share some of our thoughts about how to use the Wolfram Language in various classroom settings. Each post will focus on a different subject and will provide an example lesson for instructors to use with their students, complete with the appropriate grade levels, goals, and procedures. Our lessons are designed with the principles of computational thinking in mind, and we will highlight specifically how these lessons fit into that paradigm.
Today I’ll discuss a subject the Wolfram Language was born and bred to tackle: math. But since there is so much to do with math in the Wolfram Language, we need to focus on a specific aspect. I want to talk about how to use the Wolfram Language to create exploratory tools that allow students to develop their intuition and curiosity without the pressures of rigorous formalization.
Using the Wolfram Language in a math class supports a computational approach to critical thinking, where students explore mathematical concepts using a computer.
In this lesson I will show you how to create two exploratory tools that can be revisited at various levels of math.
Lesson title: Creating Exploratory Math Tools
Grades: 6–12
Student goals:
– Formulate questions in a way that enables them to be answered with a computer
– Use the Wolfram Language to experiment with math concepts
– Use computer-based tools for experiential math learning
Procedure:
– Create tools to explore polynomials and polygons
– Have students use these tools to develop their intuition
For the first part of the lesson, you will create a tool that your students can use to explore regular polygons. Draw a single polygon using CirclePoints:

In contrast to other educational platforms, with the Wolfram Language it’s trivially easy to turn any such expression into an interactive exploration. Use Manipulate to attach a slider to the number of sides of the polygon:

You can see that as you increase the number of sides, the polygons look more and more like disks. Add a disk in the background for comparison:

Even at the elementary level, this is an engaging tool for students to explore and develop their understanding of polygons and disks. But you can make it an even more powerful tool by thinking about the areas of the polygons.
Luckily, you don’t have to build the code out more in this example because it’s already written for you! The Wolfram Demonstrations Project is an excellent resource for prebuilt exploratory content. You can just download the code from the Demonstration “Approximating Pi with Inscribed Polygons”:

The same concept—approximating circles with multi-sided polygons—can be used as the basis for teaching elementary-school students about shape and high-school students about limits and integration. Students can ask questions such as “How does increasing the number of sides of a polygon affect the area?”, and then use this tool to explore the answer without ever having a formal introduction to the number π.
For the next part of the lesson, you will create a tool to develop intuition about polynomials. Start by plotting a quadratic polynomial:

By changing the constant term, the plot shifts up and down the y axis. By changing the coefficient on the quadratic term, the parabola becomes broader or narrower:

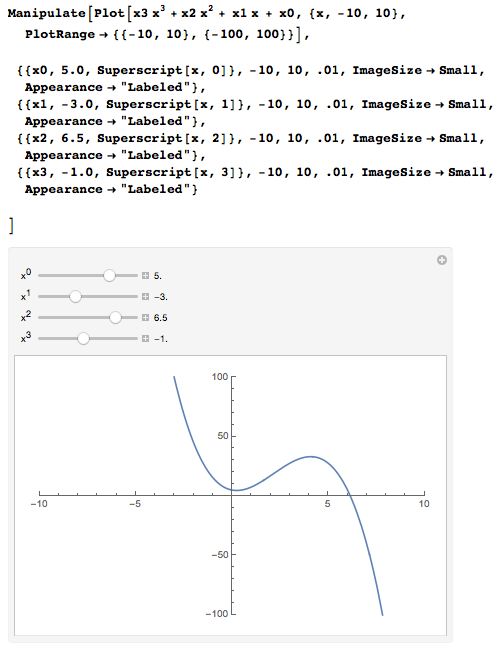
For most students, this is where intuition about polynomials ends. What happens if one changes the coefficient on the linear term? What if one adds a cubic term? To help students develop their intuition to answer these questions, create a tool that allows them to dynamically change the coefficients of a plotted polynomial:

By adjusting the sliders, students can see how the coefficients affect the shape of the polynomial. But because it never hurts to give students a little extra motivation, you can make this tool more engaging by adding a challenge. Plot a random polynomial and ask the students to slide the sliders until they feel like they’ve sufficiently matched the underlying polynomial. This “gamification” builds intuition and understanding while providing a satisfying brain teaser. As before, you don’t even have to work very hard to create this tool. You can again just go to the Wolfram Demonstrations Project and download the code. In this case, download the notebook for “Polynomial Fitter”:

These are just two examples of exploratory tools you can create (or download) using the Wolfram Language. Tools like these provide a playground for students to cultivate their intuition outside the classroom, allowing for more effective usage of their time in class. These tools also allow students who don’t feel like they “get” formal math to still develop their conceptual understanding.
To see more posts in this series, please click here.
Download this post as a Computable Document Format (CDF) file.


Comments